Vue.js 入门——Vue CLI,Vue Router,axios,iView,ECharts

简介

近期需要搭建一个展示图数据库的前端平台,之前用了很长一段时间的 AngularJS 1.3 ,但是前端技术发展非常快,在我没写前端的短短一年时间中,Angular 已经从 2.0 版本来到了 7.0 。但是 Angular 真正的大变化基本上还是在 1.0 到 2.0,基本上就是完全不同的两个框架了。
本次我用 Vue.js 来搭建这个平台。对于 Vue.js 我也是听闻已久,借此次机会学习一下 Vue.js。至于为什么选择Vue.js,原因如下:

  1. AngularJS(1.x)使用脏检查,当 watcher 越来越多时会变得越来越慢,因为作用域内的每一次变化,所有 watcher 都要重新计算。AngularJS 用户常常要使用深奥的技术,以解决脏检查循环的问题。
  2. Vue.js 的学习曲线不像Angular2那样陡峭,而且更加灵活、轻便。具体见 Vue对比其他框架
  3. Vue 非常火!

Vue-CLI

Vue 提供了一个官方的 CLI,为单页面应用 (SPA) 快速搭建繁杂的脚手架。它为现代前端工作流提供了 batteries-included 的构建设置。只需要几分钟的时间就可以运行起来并带有热重载、保存时 lint 校验,以及生产环境可用的构建版本。更多详情可查阅 Vue CLI 的文档

安装方法:

1
$ npm install -g @vue/cli

本次我进行了一些粗略的应用,使用 Vue-CLI 创建了项目:

1
2
3
4
5
$ vue create graph-visualization
Vue CLI v3.0.5
? Please pick a preset: (Use arrow keys)
❯ default (babel, eslint)
Manually select features

因为要用到路由,我选择了 Manually select features

1
2
3
4
5
6
7
8
9
10
11
12
13
Vue CLI v3.0.5
? Please pick a preset: Manually select features
? Check the features needed for your project: (Press <space> to select, <a> to toggle all, <i> to in
vert selection)
❯◉ Babel
◯ TypeScript
◯ Progressive Web App (PWA) Support
◉ Router
◯ Vuex
◯ CSS Pre-processors
◉ Linter / Formatter
◯ Unit Testing
◯ E2E Testing

项目包的选择,我选择了 BabelRouterLinter / Formatter

1
2
3
4
Vue CLI v3.0.5
? Please pick a preset: Manually select features
? Check the features needed for your project: Babel, Router, Linter
? Use history mode for router? (Requires proper server setup for index fallback in production) (Y/n)

这个设定路由的模式,设定成 history mode 可以让路由变成传统的路径。默认 hash 模式时使用 URL 的 hash 来模拟一个完整的 URL,于是当 URL 改变时,页面不会重新加载。如果不想要很丑的 hash,我们可以用路由的 history 模式,这种模式充分利用 history.pushState API 来完成 URL 跳转而无须重新加载页面。当你使用 history 模式时,URL 就像正常的 url,例如 http://yoursite.com/user/id,也好看!

1
2
3
4
5
6
7
8
9
Vue CLI v3.0.5
? Please pick a preset: Manually select features
? Check the features needed for your project: Babel, Router, Linter
? Use history mode for router? (Requires proper server setup for index fallback in production) Yes
? Pick a linter / formatter config: (Use arrow keys)
❯ ESLint with error prevention only
ESLint + Airbnb config
ESLint + Standard config
ESLint + Prettier

接下来选择了最基本的 ESLint 模式,ESLint 用于代码错误提示和纠错 ESLint with error prevention only ,以及 Lint on save ,最后两个选项无关紧要,选择保存配置在 package.json 和不保存目前配置。

iView

iView 是一套基于 Vue.js 的高质量 UI 组件库。官网 https://www.iviewui.com/ 。组件库的作用就是库里面帮你写好了很多常用的样式。
安装方法:

1
$ npm install --save axios vue-axios

比如在 .vue 文件的 <template></template> 中加入以下代码:

1
2
3
4
5
6
7
8
9
<Button>Default</Button>
<Button type="primary">Primary</Button>
<Button type="dashed">Dashed</Button>
<Button type="text">Text</Button>
<br><br>
<Button type="info">Info</Button>
<Button type="success">Success</Button>
<Button type="warning">Warning</Button>
<Button type="error">Error</Button>

就会出现以下效果:

image-20181031193341489

还有很多其他的样式,iView 的做法一般是把普通的标签首字母大写,这样就变成了 iView 的标签,比如 <input> 变成了<Input> ,就会有更加美观的输入框。

Vue Router

Vue Router 是 Vue.js 官方的路由管理器。它和 Vue.js 的核心深度集成,让构建单页面应用变得易如反掌。

image-20181031194126670

安装方法:

1
$ npm install --save vue-router

vue-axios

axios 是基于 promise 用于浏览器和 node.js 的 http 客户端。vue-axios 就是 在 Vue 中使用 axios。在本项目中我利用 axios 获取本地 json 文件或者向服务器发送 get 请求。

安装方法:

1
$ npm install --save axios vue-axios

使用方法:

1
2
3
4
5
6
7
8
9
10
11
Vue.axios.get(api).then((response) => {
console.log(response.data)
})

this.axios.get(api).then((response) => {
console.log(response.data)
})

this.$http.get(api).then((response) => {
console.log(response.data)
})

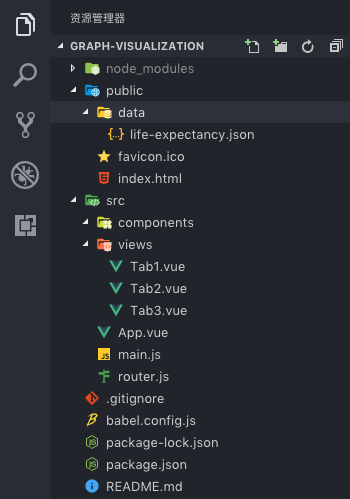
路径说明

  • node_modules : NPM 安装的包
  • public : index 入口,以及一些静态文件
  • src : 主要项目路径
    • components : Vue 编写的组件
    • views : Vue 编写的页面
    • App.vue : Vue 最外层的页面
    • main.js : Vue 全局控制
    • router.js : Vue 路由编写

image-20181031194443455

main.js

1
2
3
4
5
6
7
8
9
10
11
12
13
14
15
16
17
18
import Vue from "vue";
import App from "./App.vue";
import router from "./router";
import iView from "iview";
import "iview/dist/styles/iview.css";
import echarts from 'echarts'
import axios from 'axios'
import VueAxios from 'vue-axios'

Vue.prototype.$echarts = echarts
Vue.config.productionTip = false;
Vue.use(iView)
Vue.use(VueAxios, axios)

new Vue({
router,
render: h => h(App)
}).$mount("#app");

main.js 里面包含了导入的包,可见我导入了Vue,iView,axios 以及 ECharts。此外我还导入了本目录下的两个文件:./router./App.vue ,此外还有iView需要的 CSS 文件 iview/dist/styles/iview.css

router.js

1
2
3
4
5
6
7
8
9
10
11
12
13
14
15
16
17
18
19
20
21
22
23
24
25
import Vue from "vue";
import Router from "vue-router";

Vue.use(Router);

export default new Router({
mode: "history",
routes: [
{
path: "/",
name: "tab1",
component: () => import("./views/Tab1.vue")
},
{
path: "/tab2",
name: "tab2",
component: () => import("./views/Tab2.vue")
},
{
path: "/tab3",
name: "tab3",
component: () => import("./views/Tab3.vue")
}
]
});

路由的设置比较清楚,每个页面设置了以下三个属性:

  1. path : Url 路径,\ 就是刚进入时看到的页面。
  2. name : 这个页面的名字。
  3. component : 设置了这个页面的组件是哪一个,对应一个 .vue 文件。

App.vue

1
2
3
4
5
6
7
8
9
10
11
12
13
14
15
16
17
18
19
20
21
22
23
24
25
26
27
28
29
30
31
32
33
34
35
36
37
38
39
40
41
42
43
44
45
46
47
48
49
50
51
52
53
54
55
56
57
58
59
60
61
62
63
64
65
66
67
68
69
70
71
72
73
74
75
76
77
78
79
80
81
82
83
84
85
86
87
88
89
90
91
92
93
94
95
96
97
98
99
100
101
102
103
104
105
106
107
108
<template>
<div class="layout">
<Layout>
<Header :style="{position: 'fixed', left: 0, top: 0, right: 0}">
<Menu mode="horizontal" theme="dark" active-name="1">
<div class="layout-logo">图数据库可视化</div>
</Menu>
</Header>
<Layout>
<Sider hide-trigger class="sider-menu" breakpoint="md">
<Menu active-name="1-1" theme="light" width="auto" :open-names="['1']">
<Submenu name="1">
<template slot="title">
<Icon type="ios-navigate"></Icon>可视化
</template>
<MenuItem router-link to="/" name="1-1">Option 1</MenuItem>
<MenuItem router-link to="/tab2" name="1-2">Option 2</MenuItem>
<MenuItem router-link to="/tab3" name="1-3">Option 3</MenuItem>
</Submenu>
<Submenu name="2">
<template slot="title">
<Icon type="ios-keypad"></Icon>Item 2
</template>
<MenuItem name="2-1">Option 1</MenuItem>
<MenuItem name="2-2">Option 2</MenuItem>
</Submenu>
<Submenu name="3">
<template slot="title">
<Icon type="ios-analytics"></Icon>Item 3
</template>
<MenuItem name="3-1">Option 1</MenuItem>
<MenuItem name="3-2">Option 2</MenuItem>
</Submenu>
</Menu>
</Sider>
<Layout class="content">
<Breadcrumb :style="{margin: '24px 0'}">
<BreadcrumbItem>图数据库可视化</BreadcrumbItem>
<BreadcrumbItem>{{tabName}}</BreadcrumbItem>
</Breadcrumb>
<Content :style="{padding: '40px', minHeight: '280px', background: '#fff'}">
<router-view/>
</Content>
</Layout>
</Layout>
</Layout>
</div>
</template>

<style scoped>
.layout {
border: 1px solid #d7dde4;
background: #f5f7f9;
position: relative;
border-radius: 4px;
overflow: hidden;
}
.layout-logo {
width: 200px;
height: 30px;
border-radius: 3px;
float: left;
position: relative;
top: 15px;
left: 20px;
color: #ffffff;
line-height: 30px;
font-size: 20px;
}
.layout-nav {
width: 420px;
margin: 0 auto;
margin-right: 20px;
}
.sider-menu {
background: #ffffff;
position: fixed;
height: 100vh;
left: 0;
top: 64px;
overflow: auto;
}
.content {
padding: 0 24px 24px;
position: fixed;
left: 200px;
top: 64px;
height: 100vh;
right: 0;
overflow: auto;
}
</style>

<script>
export default {
name: "app",
data() {
return {
tabName: ""
};
},
watch: {
$route: function(newUrl) {
this.tabName = newUrl.name;
}
}
};
</script>

在 App.vue 文件中定义了整个页面的框架,因为我们是单页应用,所以所有页面都在App.vue 中活动,下面提到的 Tab1.vue,Tab2.vue,Tab3.vue 文件中的内容会通过路由被嵌入到 <router-view/> 中。这个就是通过路由构造单页应用的神奇之处。上述文件中导航栏中添加了路由信息:<MenuItem router-link to="/tab2" name="1-2">Option 2</MenuItem> ,其中 router-link to="/tab2“ 将这个链接指向了 /tab2 页。

export default {}data () {} 用来设置参数 tabName 的初始值,watch 用来 监视 $route 的变化,并将新的 $route.name 赋值给 tabName ,从而实现了在页面切换的时候,<BreadcrumbItem> 中的值会变成路由的名字。

每个 .vue 文件主要包括 templatestylescript 三个部分。

  • template : 里面写 HTML 代码,特别注意的是需要有一个根标签,也就是说 <template></template> 标签只能有一个子标签。
  • style : 里面定义了一些 CSS ,如果在 <style> 标签中添加了 scope ,那么这些 CSS 的作用域就限定在这个组件中,不会对其他页面造成影响。
  • script : 里面写 js 代码,定义了这个页面中用到的数据和一些方法。

Tab1.vue

1
2
3
4
5
6
7
8
9
10
11
12
13
14
15
16
17
18
19
20
21
22
23
24
25
26
27
28
29
30
31
32
33
34
35
36
37
38
39
<template>
<div id="myChart" :style="{width: '60vh', height: '400px', margin: '0 auto'}"></div>
</template>

<script>
export default {
name: "tab1",
mounted() {
this.drawLine();
},
methods: {
drawLine() {
let echarts = this.$echarts;
let myChart = echarts.init(
document.getElementById("myChart")
);

myChart.setOption({
title: { text: "在Vue中使用echarts" },
tooltip: {},
xAxis: {
data: ["衬衫", "羊毛衫", "雪纺衫", "裤子", "高跟鞋", "袜子"]
},
yAxis: {},
series: [
{
name: "销量",
type: "bar",
data: [5, 20, 36, 10, 10, 20]
}
]
});
}
}
};
</script>

<style>
</style>

Tab1 中做了一个 ECharts 的 Demo。需要注意的是,在官方实例的上面需要添加一句 let echarts = this.$echarts; ,这样才能使其在 Vue 中使用。

效果图:
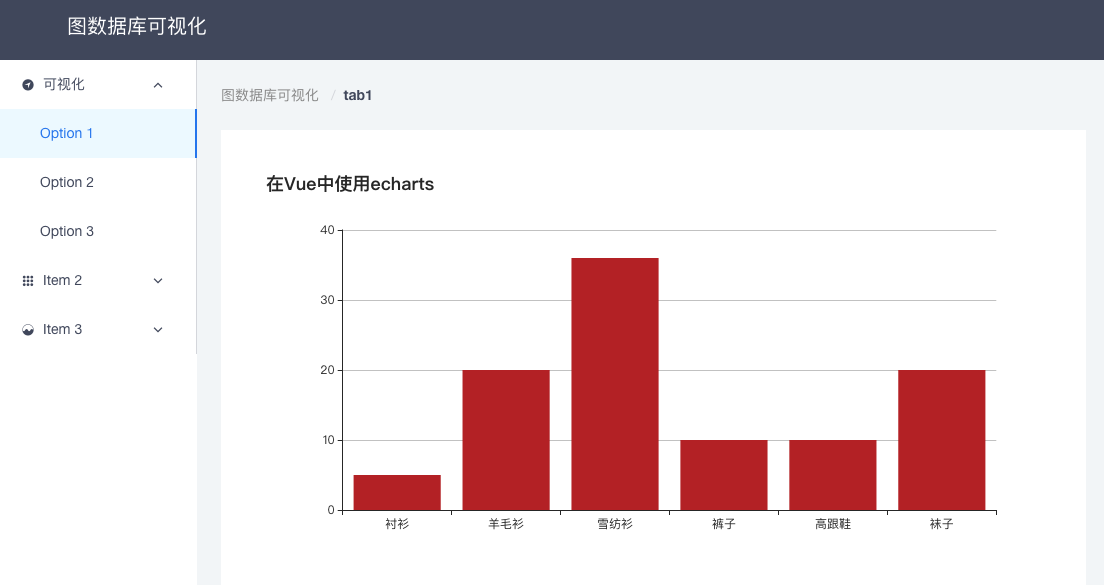
image-20181031201938611

Tab2.vue

1
2
3
4
5
6
7
8
9
10
11
12
13
14
15
16
17
18
19
20
21
22
23
24
25
26
27
28
29
30
31
32
33
34
35
36
37
38
39
40
41
42
43
44
45
46
47
48
49
50
51
52
53
54
55
56
57
58
59
60
61
62
63
64
65
<template>
<div id="myChart" :style="{width: '100vh', height: '800px', margin: '0 auto'}"></div>
</template>

<script>
export default {
name: "tab2",
mounted() {
this.drawLine();
},
methods: {
drawLine() {
let echarts = this.$echarts;
let myChart = echarts.init(document.getElementById("myChart"));

myChart.showLoading();
this.axios.get("data/life-expectancy.json").then(response => {
let data = response.data;
myChart.hideLoading();

var itemStyle = {
normal: {
opacity: 0.8,
shadowBlur: 10,
shadowOffsetX: 0,
shadowOffsetY: 0,
shadowColor: "rgba(0, 0, 0, 0.5)"
}
};

var sizeFunction = function(x) {
var y = Math.sqrt(x / 5e8) + 0.1;
return y * 80;
};
// Schema:
var schema = [
{
name: "Income",
index: 0,
text: "人均收入",
unit: "美元"
},
{
name: "LifeExpectancy",
index: 1,
text: "人均寿命",
unit: "岁"
},
{ name: "Population", index: 2, text: "总人口", unit: "" },
{ name: "Country", index: 3, text: "国家", unit: "" }
];

let option = {
... // 本文中省略了 option 中的设置
}

myChart.setOption(option);
});
}
}
};
</script>

<style>
</style>

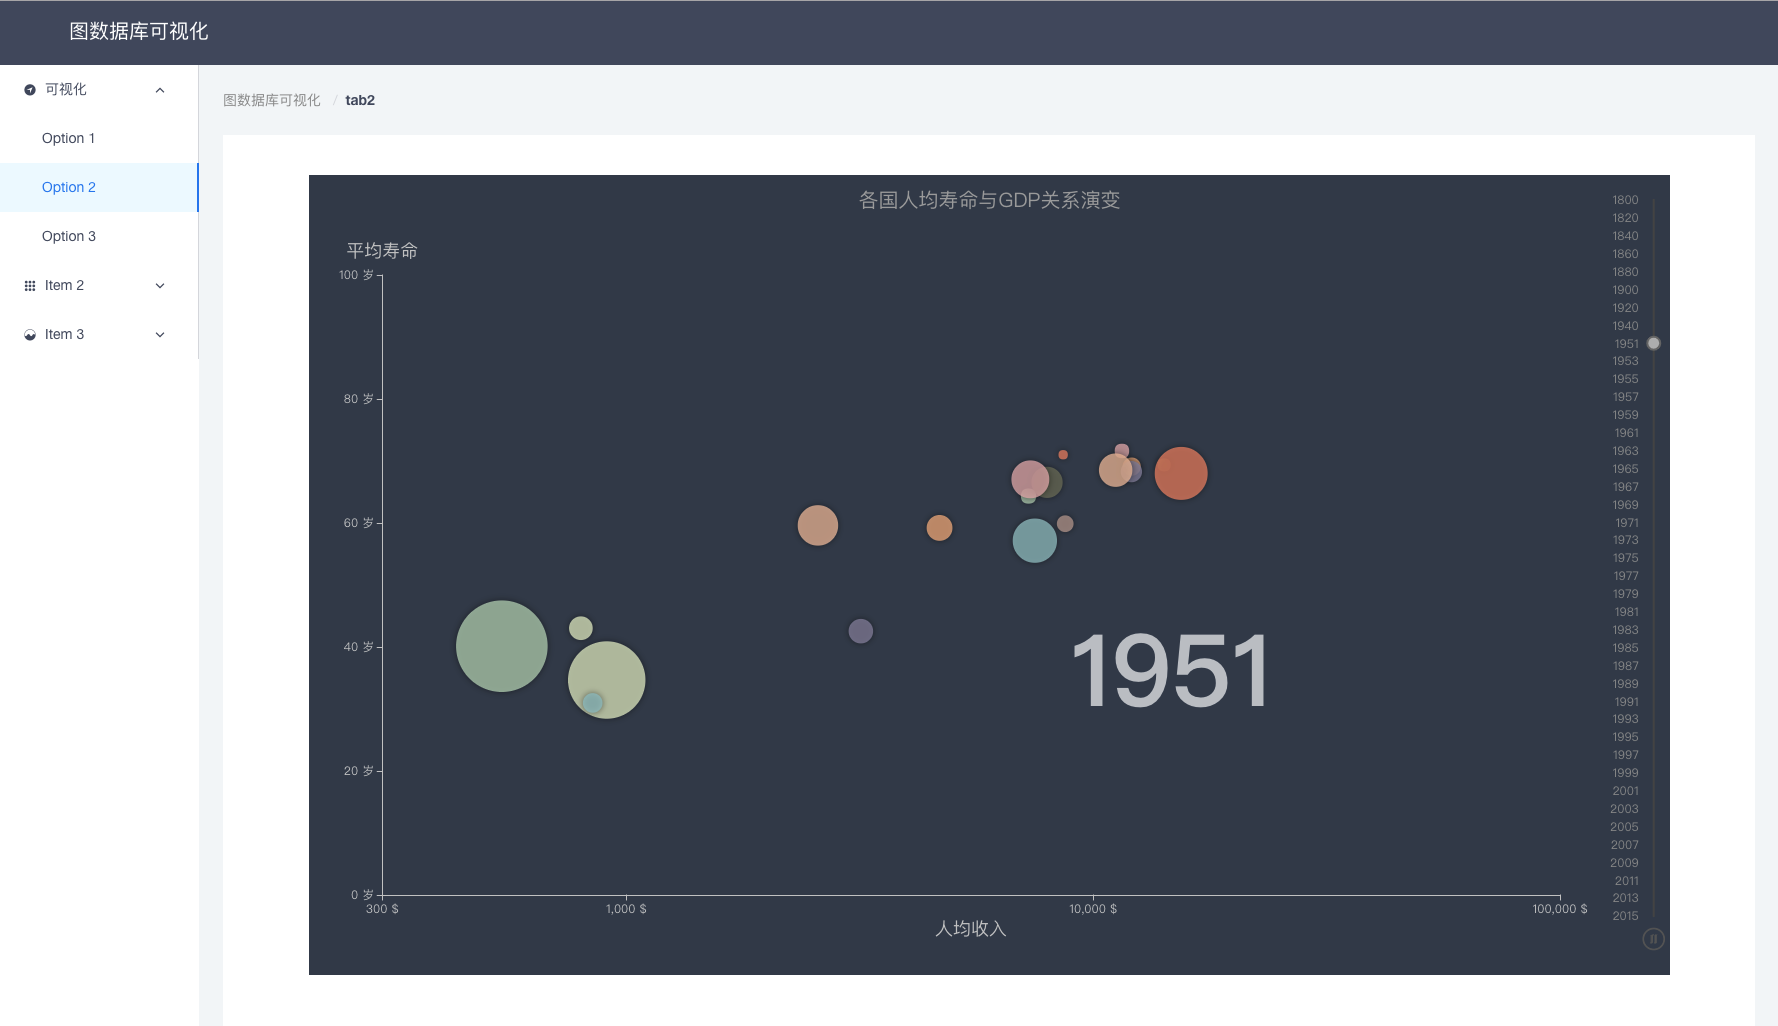
Tab2 中做了一个通过 vue-axios 的 get 请求获取本地 json 文件内容绘制 ECharts 的 Demo,获取服务器上面的内容同理。需要注意的是,本地文件要放在 public 文件夹下,不然是访问不到的。本文中省略了 option 中的设置,具体设置可以在 ECharts 各国人均寿命示例 中找到。

export default {}mounted () {} 是在该页面被挂载的时候会运行的函数,在 Tab2 中设定了在挂载就会运行 this.drawLine()this 会指向本页面的变量、方法等。

效果图:
image-20181031203648054

Tab3.vue

1
2
3
4
5
6
7
8
9
10
11
12
13
14
15
16
17
18
19
20
21
22
23
24
25
26
27
28
29
30
31
32
33
34
35
36
37
38
39
40
41
42
43
44
45
46
47
48
49
50
51
52
53
54
55
56
57
58
<template>
<div>
<Row>
<Col span="6">
<Row>
<Col span="24" class="search-input">
<Input v-model="origin" placeholder="出发地"/>
</Col>
<Col span="24" class="search-input">
<Input v-model="target" search enter-button="出发" placeholder="目的地" @on-search="go"/>
</Col>
</Row>
</Col>
</Row>
<br>
<Row>
<Col span="24" class="search-input">
<p v-if="origin && target">你输入的是: {{ origin + "和" + target }}</p>
<p v-else>你为什么要清空{{origin ? "目的地" : (target ? "出发地" : "出发地和目的地")}}</p>
</Col>
</Row>
</div>
</template>

<script>
export default {
name: "tab3",
data() {
return {
origin: "杭州",
target: "北京"
};
},
mounted() {
this.drawLine();
},
methods: {
drawLine() {},
go() {
if (this.origin && this.target){
this.$Notice.open({
title: '你出发啦!',
desc: this.origin + "->" + this.target
});
} else {
alert("请输入出发地和目的地");
}

}
}
};
</script>

<style>
.search-input {
padding: 5px;
}
</style>

Tab3 是一个 Vue 表单的 Demo。到后来图数据库的展示需要通过输入框获取信息,于是做了一个样例。

效果图:
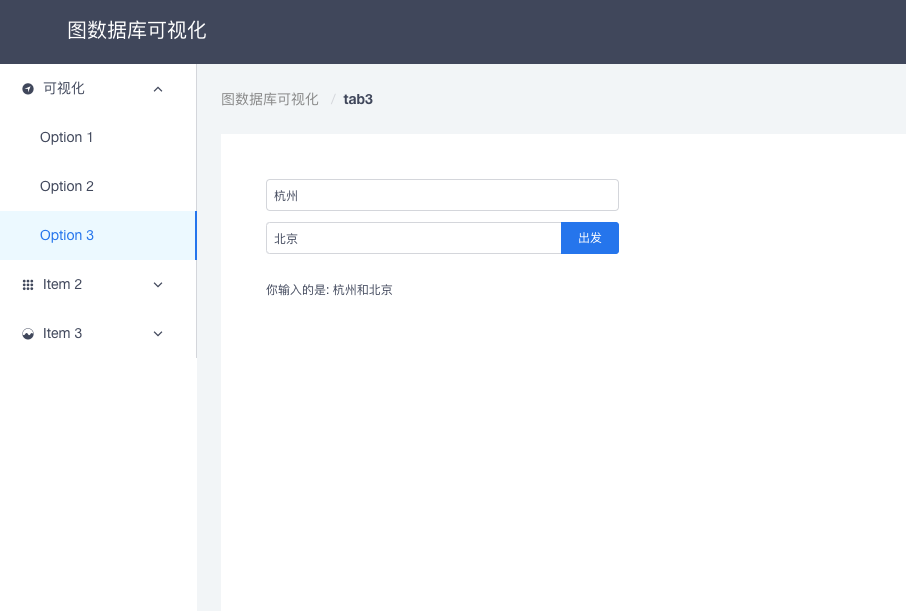
image-20181031203949490

设置了出发地和目的地初始值分别为杭州和北京,点击出发按钮会在页面右上角出现横幅:

image-20181031204130521

在出发地或者目的地其中一个为空的时候会有提示:

image-20181031204251865

这里用了两次的 ? : 三元运算符,其实也可以通过 v-show 实现。具体实现就不多提了,代码还是很清晰的,如果没看懂建议补 Vue 的基础知识,比如 v-if 等用法。至于横幅的实现部分 this.$Notice.open({}); ,这个是 iView 的通知组件,在其官网就可以看到用法。

总结

这个项目在我学习了一天 Vue 以后就简单实现了,可见 Vue 是不难学的,当然这之前需要一些其他知识的铺垫,比如 Node.js,NPM,MVC 等。之后深入的内容有机会再学咯。

项目地址: https://github.com/RyanLiGod/graph-visualization

0%